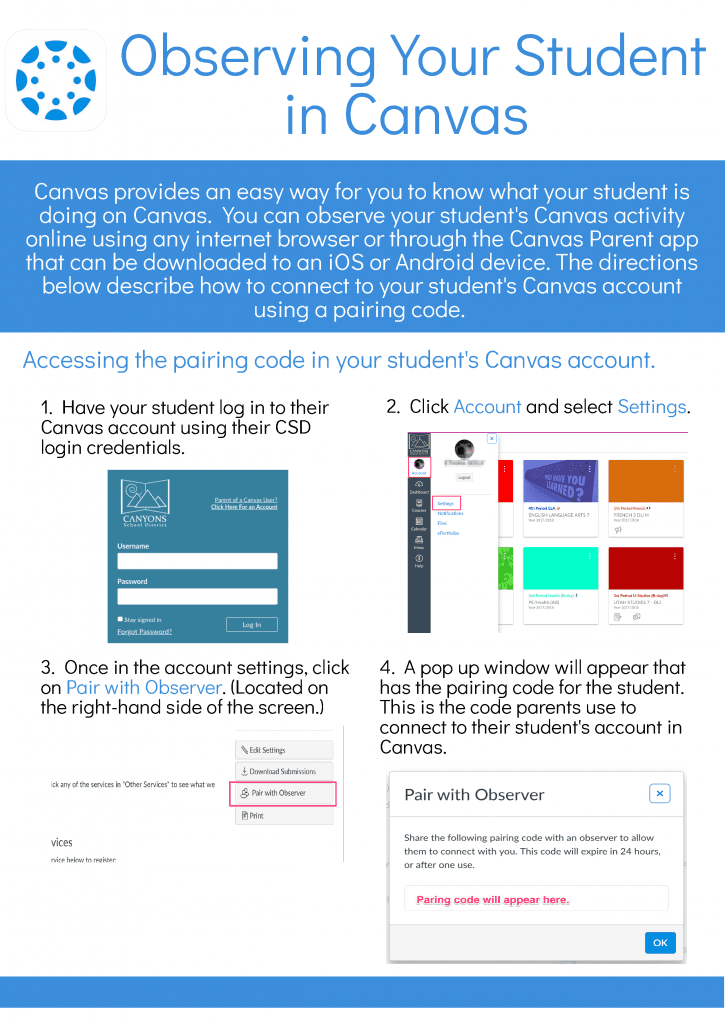
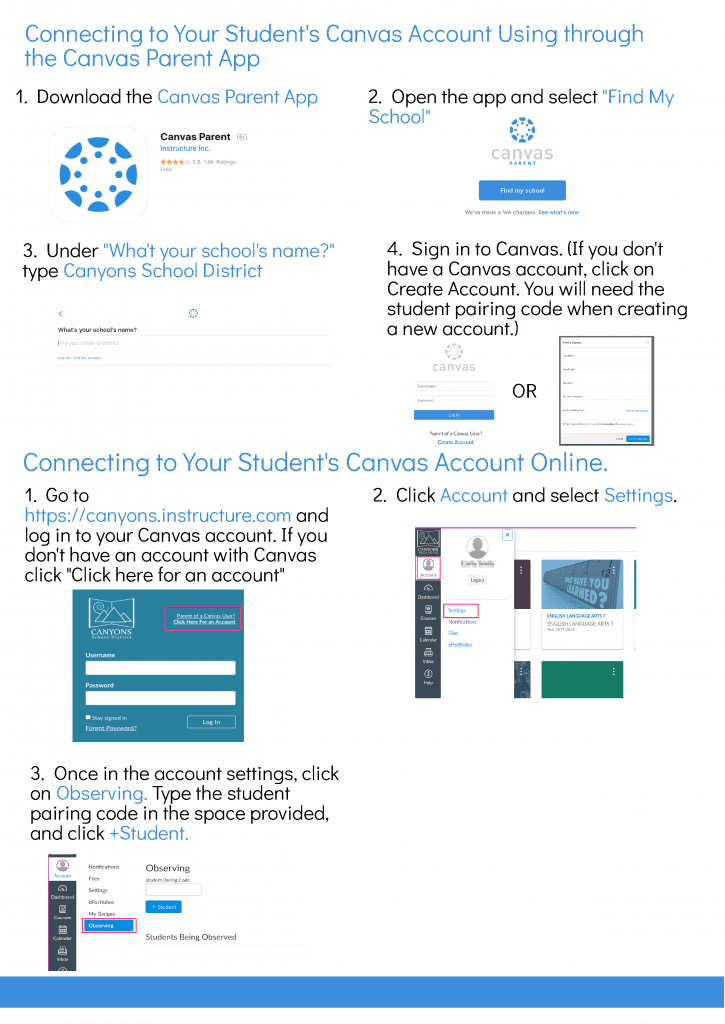
Canvas is our Learning Management System. Parents can sign up for a free account in order to view the resources and activities posted in their child’s courses that are available on Canvas. You can access our Canvas by using a browser on a computer, or by installing the Canvas Parent app on your mobile device.
- Read announcements, view the calendar, and see the course syllabus.
- Access a list of assignments with due dates.
- See your child's assignments
- View your child’s scores on assignments in Canvas. Course grades will continue to be published in Skyward.
- View your child’s scores on assignments in Canvas.
- Use the Inbox to contact the teacher.
- Set up notifications to get emails or texts for announcements, assignments, etc.
- View the instructional content in the course.
If you need to create a Parent Account, please look at the guides below.
Canvas Links
How do I setup up my a Family Observer account?
Media error: Format(s) not supported or source(s) not found
Download File: https://www.canyonsdistrict.org/wp-content/uploads/2021/08/501-Observer-Account-Registration-and-Student-Pairing-1.mp4?_=1How do I set my Notification Preferences?
You can receive Canvas notifications for the courses you are observing. Notifications are sent to Canvas contact methods listed in your account User Settings. Canvas includes a set of default notification preferences. However, you can change the default settings by setting your own notification preferences. Your notification preferences only apply to you; your notification settings do not affect course notifications sent to the student you are observing.
You can select one of four delivery frequency options for each notification type:
Notify me right away
Daily summary
Weekly summary
Don’t send.
If you change a setting, the change is effective immediately to your account.
If you reply directly to email notifications from outside of Canvas, your reply also appears in your Canvas Inbox. However, attachments added as part of an external reply are not included with the Canvas Inbox message.
Open Account Notifications
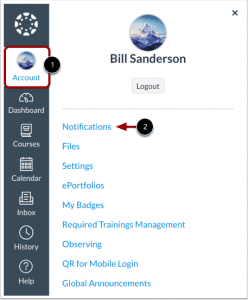
In Global Navigation, click the Account link [1], then click the Notifications link [2].
View Account Notification Settings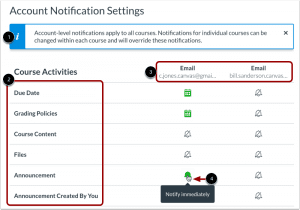 The Account Notification Settings page displays a banner reminding you that account-level notifications apply to all courses [1].
View the account-level notification types [2] and your listed contact methods [3].
Each notification has a default delivery frequency preference. To view the current notification delivery frequency for a notification type and contact method, hover over the notification icon [4].
View Notification Details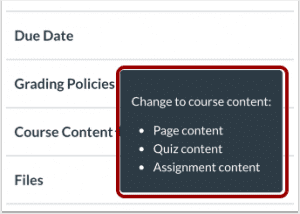 To view details for a notification, hover over the notification name.
Set Notification Preferences
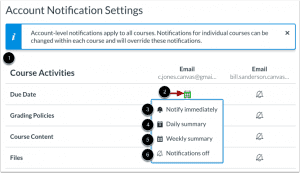
To view an observed student’s name in notifications, click the Show name of observed students in notifications checkbox [1]. Currently, only grade update notifications include observed student names.
To change a notification delivery frequency for a contact method, locate the notification and contact method. Then click the notification icon [2]. You can select one of four delivery frequency types:
Notify immediately [3]: receive these notifications right away. These notifications may be delayed by up to one hour in case an instructor makes additional changes, which prevents you from being spammed by multiple notifications in a short amount of time.
Daily summary [4]: receive a daily summary for this notification type.
Weekly summary [5]: receive a weekly summary for this notification type.
Notifications off [6]: no notifications sent for this notification type.
Notes:
Account-level notification preferences automatically apply to all of your courses. However, you may be able to manage notifications for a single course.
Twitter notification preferences do not support daily summary or weekly summary options.
Unregistered contact methods display on the Account Notification Settings page but notifications will not be sent until you confirm the registration.
How do I edit my Profile?
Open Account Profile
In Global Navigation, click the Account link [1], then click the Profile link [2].
Edit Profile
Click the Edit Profile button.
Edit Profile Picture
To upload a profile picture, click the profile picture icon.
Note: Profile pictures are a separate permission from profiles. If you do not see a placeholder picture, your institution has not enabled this feature.
Edit Name and Title
If you are allowed to change your name, type your name in the name field [1]. Type your title in the title field [2].
Add Contact Methods
If you have connected to any web services, click the checkbox underneath the web service to indicate how you wish to be contacted via that service [1]. To add additional services, click the Manage Registered Services link. Please note that any selected services will not be shared with other course/group members unless you have previously selected the sharing checkbox in the Manage Registered Services page.
The Discussion icon [2] automatically appears as a contact method for Admins so users can contact you through Canvas Conversations. It cannot be selected by any other users.
Note: As created in your user profile, email addresses do not appear as a contact method and are only used for Canvas notifications. Canvas users should contact each other via Conversations.
Edit Bio
Type your biography in the bio field. You can add hobbies and interesting facts about yourself.
Edit Links
To add personal links to your profile, such as personal websites, blogs, or portfolios, enter the title of the link in the title field [1]. Type the URL in the URL field [2]. Click the remove icon to delete the link [3]. Click the Add another link button to add another link [4].
Save Profile
Click the Save Profile button.
What can an observer do in Canvas?
In Canvas, the Observer role can be used to enroll parents, mentors, and guests who would like to participate in a Canvas course but do not need to earn course credit. Observers have limited permissions that allow them to see what is going on in a course without interrupting the flow of daily course communication. Like students, Observers cannot view a course until it is published and the course has started.
To learn more about the observer role, view the Parent Registration and Student Observation video.
Observers may be able to view assignments, course events, and grades for a student in the Canvas Parent app. For more information about course-level user permissions, view the Canvas Course Permissions PDF.
Observer Role Use
Observers can view course data but cannot participate in all Canvas areas. Observers may be added to a course to observe course data. For instance, instructors sometimes invite guests to join their courses, such as for a web conference. Enrolling the guest with an observer role allows access to the course without being able to affect any course data or participation.
The main use of the observer role is to link a user to a student. Observers can be linked to a student or multiple students and view the student’s data in the course. Parents are often enrolled as observers and linked to students, especially in K12 environments. Observers cannot submit work on behalf of the students they observe, but they can see student grades, assignments and events, and course interactions.
Depending on the institution, observers can have different levels of access. Observers can be linked to a single student or multiple students. These links can be at the account or course levels.
- A user-account level link will ensure the observer is linked to a student and will enroll the observer in each student’s past, current, and future courses automatically.
- A course-level link is a link between an observer’s enrollment in a course and the student’s enrollment in that same course. These links have to be created each time the student and observer are enrolled in a course.
Observer Access in Canvas
To learn more about observer participation, view the Observers Visibility and Participation PDF.
Observers can
- View and read announcements
- View assignments index page
- View the calendar
- Join conferences, if invited
- Join collaborations, if invited
- View personal inbox
- Send conversation messages to instructor and student they are observing
- View the dashboard
- View and read discussions
- View files unless they are locked
- View grades, view assignment due dates and comments, and print grades
- View modules and see due dates and point values
- View pages and contribute if the instructor enables the Anyone can edit it setting
- View profile pictures, if available
- View syllabus
- View outcomes
- View quizzes index page
Observers cannot
- Comment on announcements or discussions
- Submit assignments or quizzes
- View course rosters
- Send conversation messages to students in the course they are not observing
- View locked files or folders
- Join groups
- View unpublished courses
- Access the Chat tool
- Reserve appointment slots in the Scheduler
- View grade audit trail
Observer Limitations
- Observers can view the same content as the student they are observing unless the content is unpublished or restricted by locked dates.
- Observers can view module content locked by prerequisites or requirements, as module progression is not measured for observers.
- Observers can view assignments even if the student they are observing has not completed them unless the assignments are locked.
- Each instructor can customize the links in the Course Navigation and limit the number of features that students and observers can see. Observers may or may not see links to certain features.
How do I view the Grades page for my child?
As an observer, you can view grades for students you are observing. The Grades page in a course displays your student’s current course grade as well as all current grades for course assignments. You can also view assignment scoring details, comments, and rubrics. If the instructor is using multiple grading periods, you can also filter grades by grading period.
You can also view grades for your student’s concluded courses from the Global Navigation Menu Courses link.
Note:
- Some details in the Grades page, such as scoring details and the total grade, may be restricted in your student’s courses.
- You can also access the Grades page using the Dashboard View Grades link.
Open Course
In Global Navigation, click the Courses link [1], then click the name of the course [2].
Open Grades
In Course Navigation, click the Grades link.
View Course Grade
The grade summary displays your student’s total grade [1], and allows you to show or hide all scoring details, comments, and rubrics shown in the Grades page [2].
Depending on the grade calculation for the course, your student’s total grade may display as a point value or as a percentage.
Note: Your instructor may restrict you from viewing your student’s total grade [3].
View Current and Total Grades
By default, the Grades page displays your student’s current course grade. The current grade is calculated by adding the score for graded assignments according to their weight in the course grading scheme. This grade is calculated with the Calculate based only on graded assignments checkbox [1].
The total grade is calculated by adding all assignments, both graded and ungraded, according to their weight in the course grading scheme. To view the total grade, deselect the Calculate based only on graded assignments checkbox [2].
Note: If your student’s instructor has restricted you from viewing the current and/or total grades, selecting or deselecting the sidebar checkbox still affects individual assignments. You may be able to see small changes with assignment shading indicating that a grade may be dropped from the course.
View Assignment Grades
From the grades page you can select the course for which you want to view grades by clicking the Course drop-down menu [1]. By default, the Grades page displays assignments chronologically by assignment due date. To sort grades by module, assignment title, or assignment group, click the Arrange by drop-down menu [2]. However, if modules or assignment groups aren’t used in the course, they won’t be included as sorting options. To apply selected sort options, click the Apply button [3]. Assignments that are not part of a module display at the end of the assignments list in alphabetical order.
You can view assignment names [4], due dates [5], status [6], scores [7], and total point values [8]. You may also be able to view whether the assignment includes a comments, scoring details, or a scoring rubric [9].
You may see various grade icons in the score column indicating the assignment type [10]. Assignments that display a grade icon have not been graded by the instructor. Once the assignment is graded, the icon will be replaced by your student’s score.
To print your student’s grades, click the Print button [11].
Note: The Status column only appears if one or more assignments have an associated status.
View Grading Periods
If grading periods are enabled in your student’s course, you can view their grades according to grading period [1]. By default the Grades page displays the current grading period. If an assignment does not include a due date, it will display as a part of the last grading period. To view grades for another course, click the Course drop-down menu [2]. To see the specified grading period and course, click the Apply button [3].
If your student’s course includes weighted assignment groups, assignment groups may vary in the sidebar depending on which grading period you are viewing [4]. An assignment group displays if the group has at least one assignment due in the selected grading period.
When grading periods are weighted and you select the All Grading Periods option, the sidebar displays the weights of each grading period.
View Grade Info
Some assignments display a black warning icon [1], which alerts you that points earned from this assignment will not count toward your student’s final grade [2]. Your student should still submit this assignment unless it has been excused by their instructor.
View Comments
If your student’s instructor left a comment on the assignment, the assignment displays a comment icon [1]. To view comments, click the icon. Comments display chronologically [2]. To close comments, click the close link [3].
View Scoring Details
If you can view scoring details, click the Check Mark icon [1]. You can view the grade distribution for the assignment and view the mean, high, and low scores [2].
The graph’s horizontal line extends from 0 to the assignment’s highest possible score [3]. The white box extends from the lowest to the highest student scores. Your student’s score appears as a square on this plot [4].
You will only see scoring details if more than five other student submissions are also scored. If you do not see the scoring details, then fewer than five other students submissions are scored.
To close scoring details, click the Close link [5].
View Rubric
If an assignment includes a rubric, the assignment may display a rubric icon [1]. To view your student’s results, click the icon. View your student’s score based on the rubric [2]. To close the rubric, click the Close Rubric link [3].
Note: The total rubric score may be restricted by your student’s instructor.
View Assignment Groups
The Grades page lists assignment groups included in your student’s course [1]. Assignment groups allow instructors to organize assignments, discussions, and quizzes into groups and apply specific grading rules or weights to those groups. You can view the percentage score for each group [2] and the points your student has earned versus the total points possible [3].
Note: Assignment group percentages may be restricted by your student’s instructor.
View Percentage Grade Calculation
The sidebar displays information about how your student’s grades are calculated.
If assignment groups are weighted, the sidebar displays the breakdown of weighted assignment groups [1].
Assignment group weights always display as a percentage. If your student’s instructor allows you to view total grades, you can see a breakdown in the points your student has earned versus the total points possible [2].
Note: Your student’s instructor may restrict you from viewing your grade totals in assignment group percentages [3].
View Points Grade Calculation
If your student’s course does not use assignment groups, their total grade can be displayed in points or as a percentage. If the total grade displays in points, you can view your student’s overall grade percentage.
Note: Your student’s instructor may restrict you from viewing grade totals.
View Current and Total Grades
By default, the Grades page displays your student’s current course grade. The current grade is calculated by adding the score for graded assignments according to their weight in the course grading scheme. This grade is calculated with the Calculate based only on graded assignments checkbox [1].
The total grade is calculated by adding all assignments, both graded and ungraded, according to their weight in the course grading scheme. To view the total grade, deselect the Calculate based only on graded assignments checkbox [2].
Note: If your student’s instructor has restricted you from viewing the current and/or total grades, selecting or deselecting the sidebar checkbox still affects individual assignments. You may be able to see small changes with assignment shading indicating that a grade may be dropped from the course.
How do I navigate a Canvas course?
Open Course
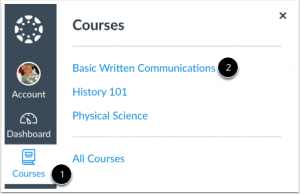
In Global Navigation, click the Courses link [1], then click the name of the course [2].
View Canvas Course Interface
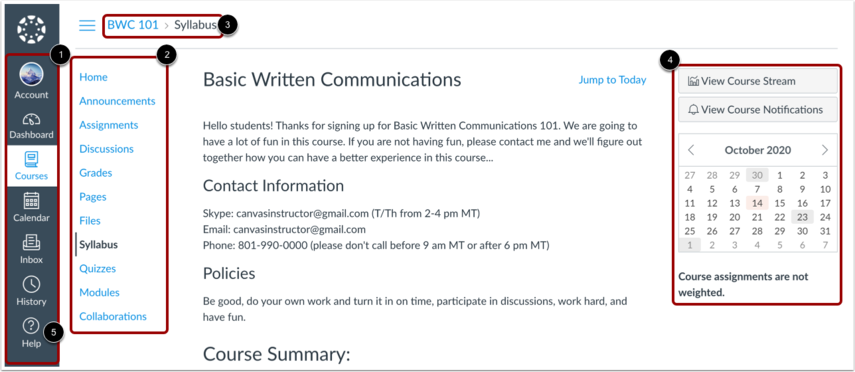
Observers can view Global Navigation, Course Navigation, Breadcrumb Navigation, Sidebar, and Help link.
- The Global Navigation helps you get to where you want to go across all of your Canvas courses [1].
- The Course Navigation helps you get to where you want to go within your student’s course(s) [2].
- The Breadcrumb Navigation shows you where you have navigated to inside of a course and gives you a quick and easy way to move backward [3].
- The Sidebar will be mostly empty for Observers. Depending on the page you are visiting, your student’s upcoming assignments and events may be displayed [4].
- The Help link is very important. To ask for assistance from your student’s teacher or the Canvas Support Team, click the Help link [5].
Note: Depending on your student’s teacher, you may not have access to certain parts of the course.
How do I link my account to ANOTHER child?
If you signed up for a Canvas account as a parent, you can add students to observe within the same school. Additionally, if a school created an observer account linked to a student for you, you can add students to observe.
To link yourself to a student, you will need to enter a student-specific pairing code. Pairing codes are case-sensitive and are valid for seven days. Students can generate pairing codes from their User Settings. Depending on school permissions, admins and instructors may also be able to generate pairing codes. For more information on pairing codes, view the Pairing Codes – Frequently Asked Questions PDF.
You can also remove observed students from the Observing page.
Open Account Settings
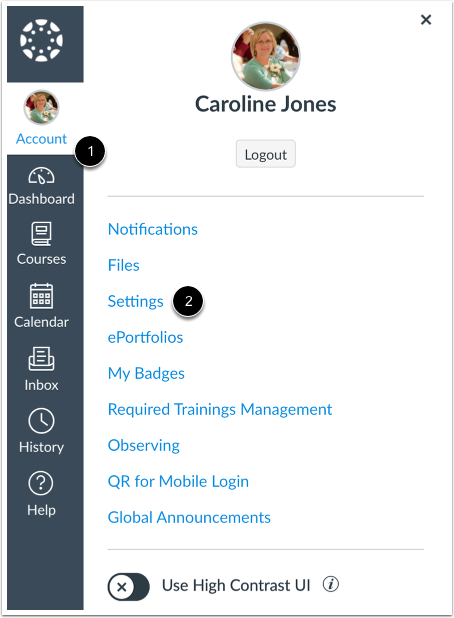 In Global Navigation, click the Account link [1], then click the Settings link [2].
Open Observing
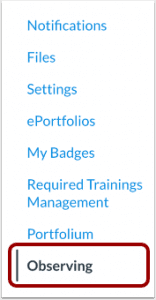 In User Navigation, click the Observing link.
Add Student
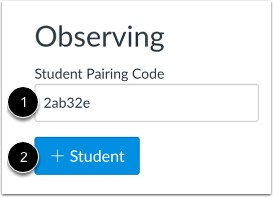 Type the pairing code in the Student Pairing Code field [1] and click the Add Student button [2].
View Student
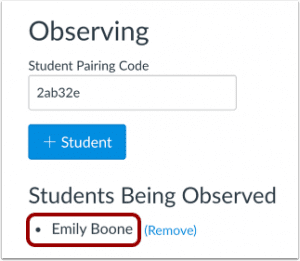 View the paired student.
Remove Student
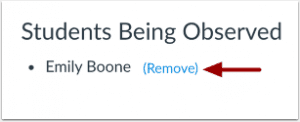 To stop observing a student, click the Remove link.
Confirm Removal
 To confirm you want to remove the student from your observer list, click the OK button.
Guides for using the Canvas Parent Mobile App
Do teachers using Canvas also still use Skyward?
Yes. PowerSchool is our Student Information System (SIS) and will continue to be used throughout the district. The table below gives information on the functions of each system.
Skyward (SIS) | Canvas (LMS) |
|
|
PARENT SETUP IN CANVAS
STUDENT LOGGING INTO CANVAS
Logging into Canvas
Media error: Format(s) not supported or source(s) not found
Download File: https://www.canyonsdistrict.org/wp-content/uploads/2020/08/Canvas-Access-2.mp4?_=2Download File: https://www.canyonsdistrict.org/wp-content/uploads/2020/08/Canvas-Access-2.mp4?_=2
